내 인생을 픽사 영화로 — AI 1분 영화 제작, A부터 Z까지Turning My Life into a Pixar-style Film — an AI one-minute movie, A to Z
유튜브 영상 하나(스토리 원본)와 제 목소리, 그리고 AI 도구 네 개로 72초짜리 인생 영화를 만들었습니다. 이 페이지는 그 전 과정의 기록입니다 — 실제로 쓴 프롬프트, 실제 설정값, 실제 비용, 그리고 실패담까지 전부요.One YouTube video (the story source), my own voice, and four AI tools became a 72-second film about my life. This page documents the entire process — the actual prompts, the actual settings, the actual costs, and the failures too.
최종 완성작 「두 번 체크」 — 72초, 20컷, 1080p. 내레이션은 직접 녹음한 제 진짜 목소리, 배경음악은 Suno로 작곡했습니다. −14 LUFS 마스터.The final film, “Check Twice” — 72 seconds, 20 shots, 1080p. The narration is my own voice, recorded for real; the underscore was composed with Suno. Mastered at −14 LUFS.
준비물What you need
Claude CodeHiggsfield MCPElevenLabsSunoffmpeg인생 이야기 하나one life story
코딩은 몰라도 됩니다. 전 과정이 Claude와의 대화로 진행됩니다 — AI가 파이프라인이고 당신은 감독입니다.No coding required. The whole process is a conversation with Claude — the AI is the pipeline, you are the director.
STEP 1
스토리 — 원본에서 로그라인까지Story — from source to logline
시작은 제 유튜브 영상 「다 포기한 인생에서 억대연봉 되기까지」 하나였습니다. 영상의 자막(transcript)을 Claude에게 주고 물었습니다: "이걸 1분짜리 픽사 영화로 만든다면?"It started with a single YouTube video of mine. I gave Claude the transcript and asked: “If this were a one-minute Pixar film, what would it be?”
AI가 제안한 컨셉이 「두 번 체크(Check Twice)」였습니다 — 보드게임에서 무심코 반칙을 하다 친구에게 들킨 순간, "알렉스는 두 번 체크해야 돼~"라는 농담 한마디에 증명 중독의 인생 전체가 무너지고 다시 시작되는 이야기. 12분짜리 영상에서 감정의 급소 하나를 찾아내는 것, 그게 스토리 단계의 전부입니다.The concept the AI pitched was “Check Twice” — the moment I got caught cheating at a board game, and my friend’s teasing one-liner cracked open a whole life of proving-addiction. Finding the one emotional pressure point in a 12-minute video: that is the entire story step.
로그라인 · 훅 · 모티프 · 컬러 아크를 하나의 "스토리 바이블"로 정리 (모티프: 반복되는 '체크' — 게임 체크, 성적 체크, 마음 체크)Logline, hook, motif, color arc go into one “story bible” (the motif: recurring “checks” — game checks, grade checks, heart checks)
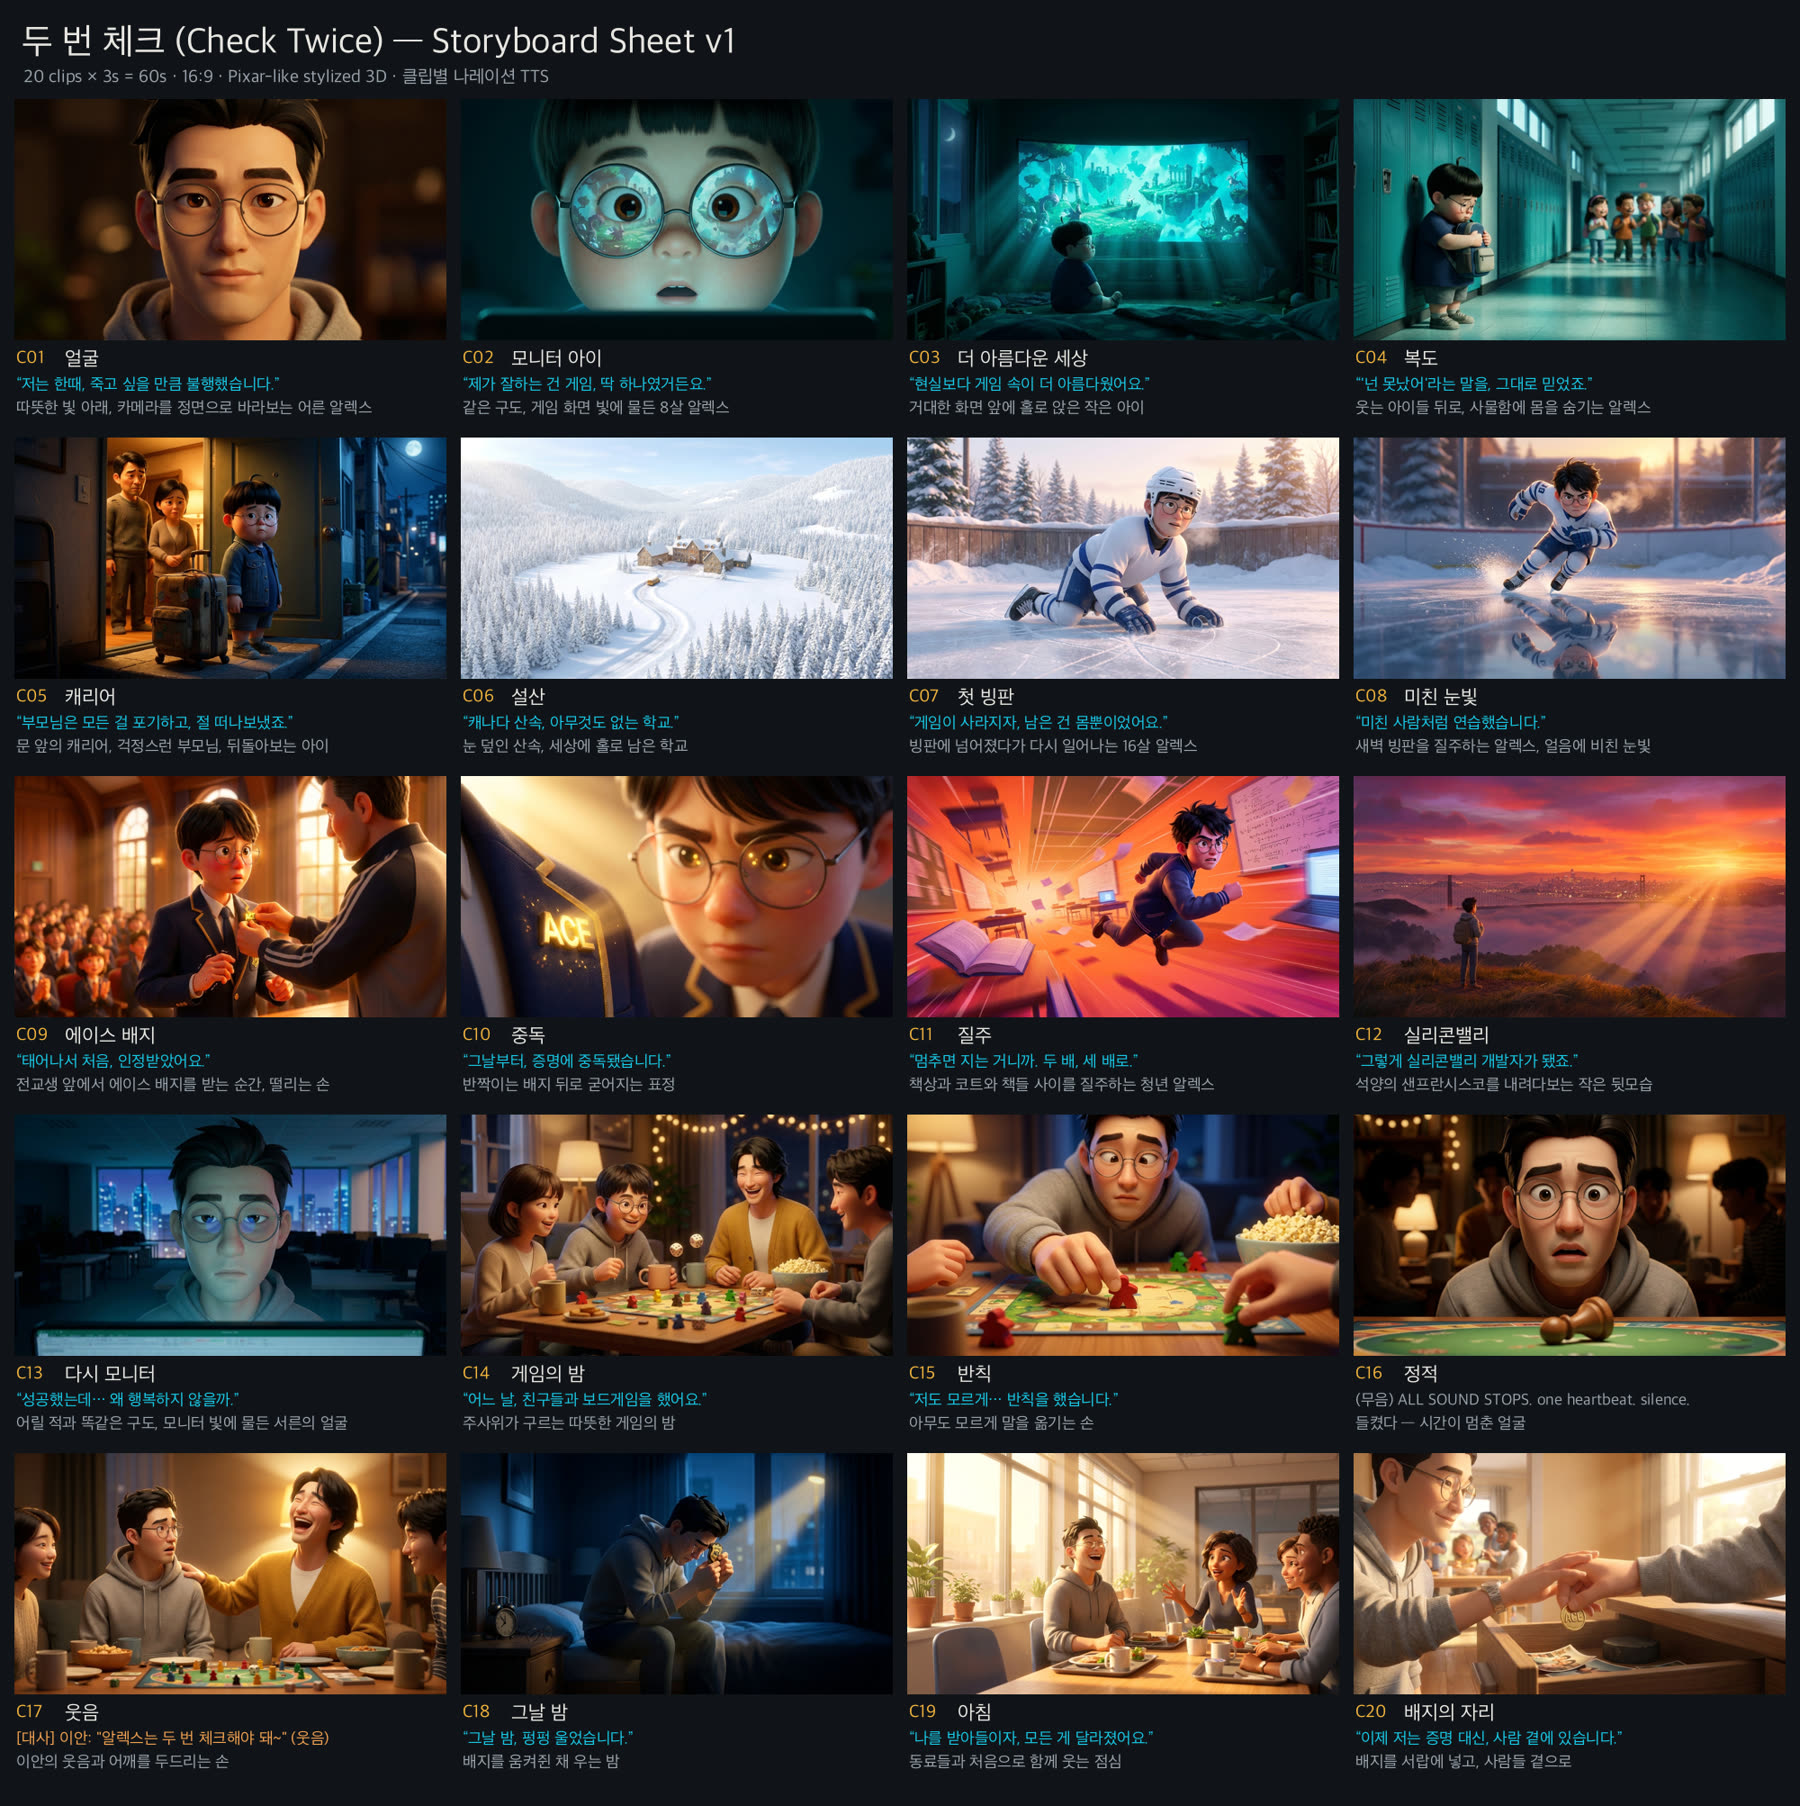
스토리보드 우선 원칙: 영화 전체를 20개의 컷으로 나누고 컷마다 정지 이미지 1장 + 내레이션 1줄을 배정Storyboard-first rule: the film is divided into 20 shots, each assigned exactly one still image + one narration line
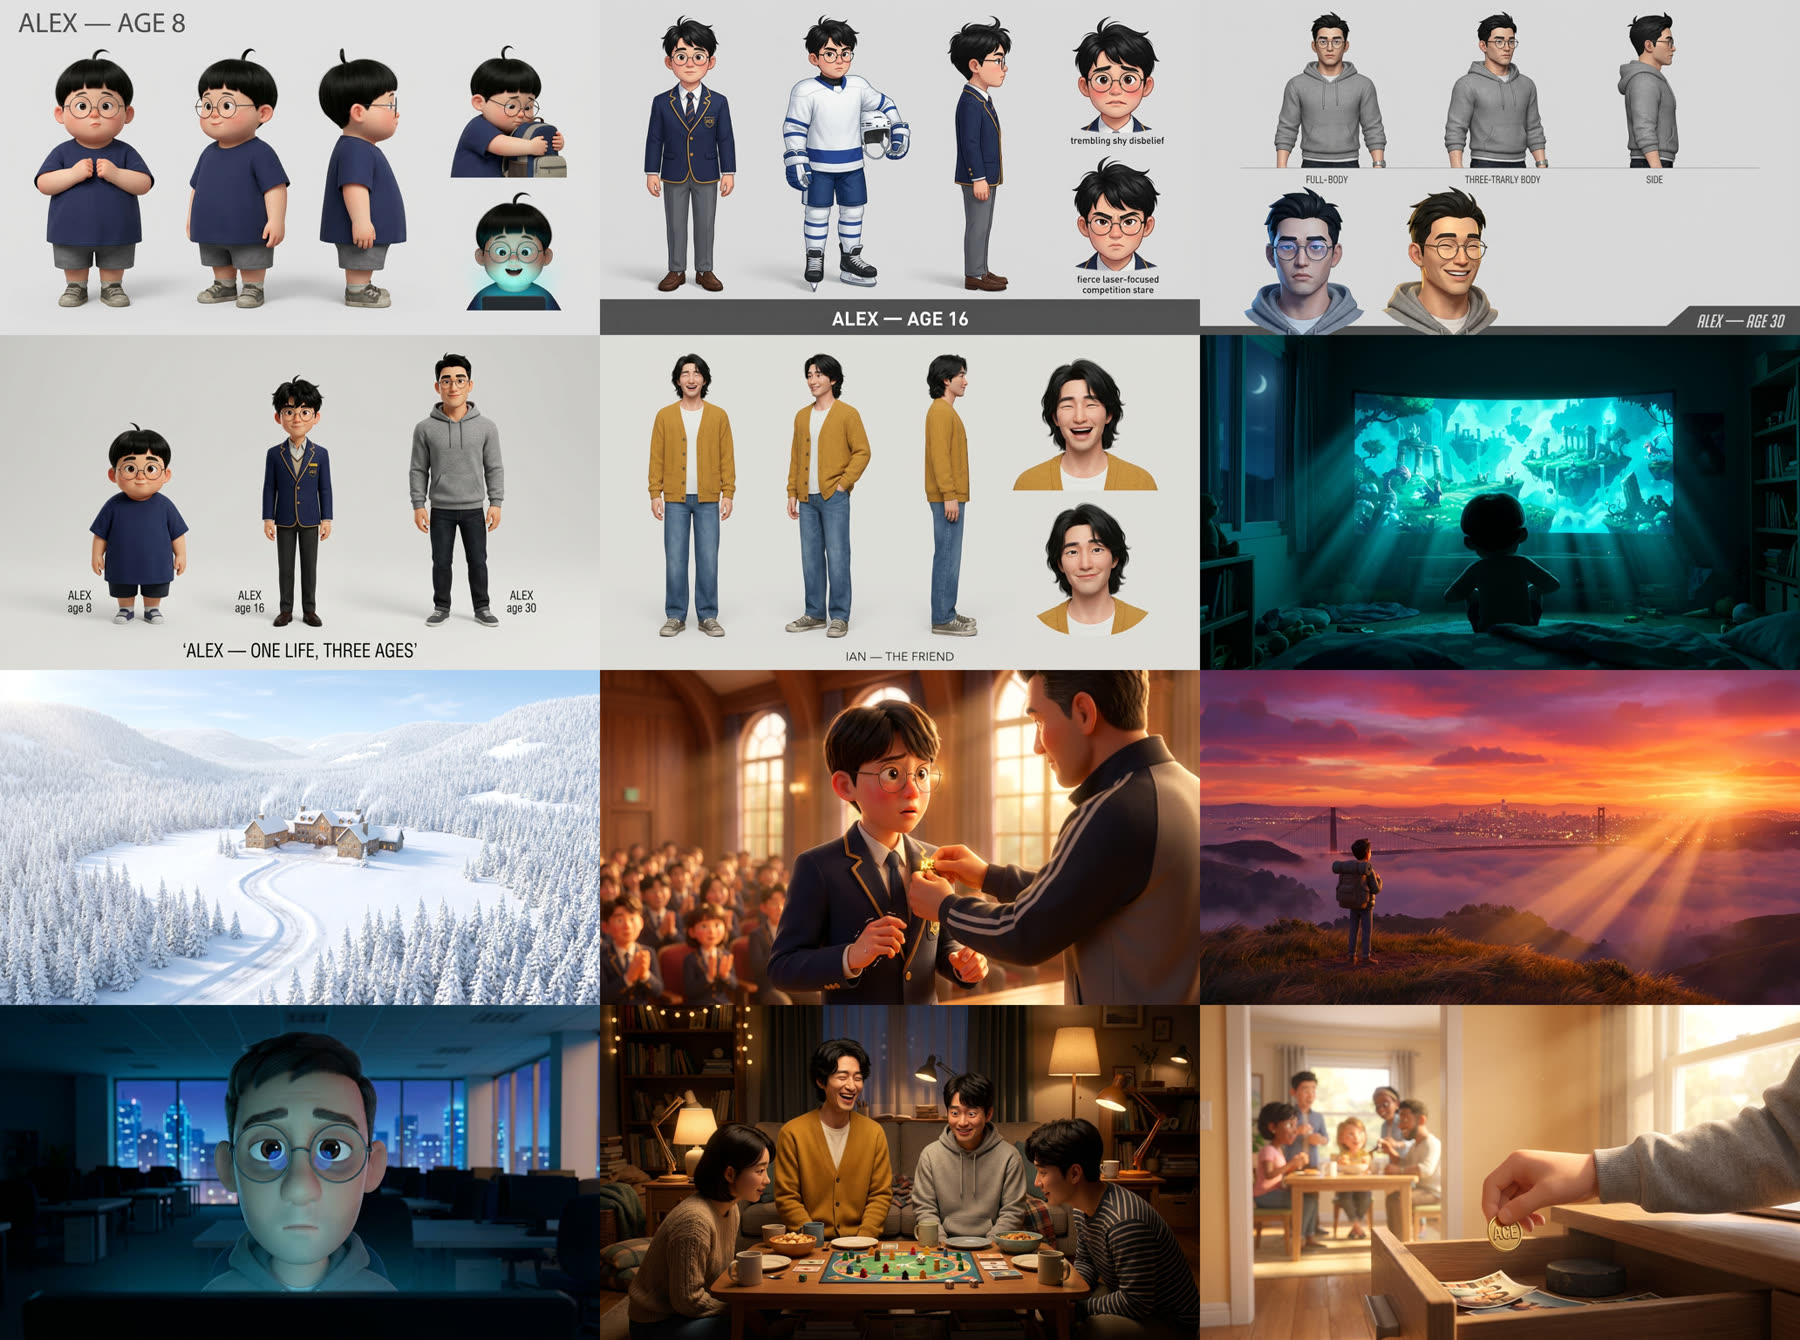
컨셉 무드 프레임 7장 — 감정 비트당 1장, 픽사의 '컬러 스크립트'와 같은 역할입니다. 새벽 모니터의 청록 → 눈의 흰색 → 배지의 골드 → 노을 → 사무실의 공허한 블루 → 보드게임 밤의 텅스텐 → 골든 모닝. 스토리 단계에서 이 색의 흐름부터 확정하고, 이후 모든 이미지가 여기에 맞춰집니다.Seven concept mood frames — one per emotional beat, doing the job of a Pixar “color script.” Monitor teal at dawn → snow white → badge gold → sunset → empty office blue → game-night tungsten → golden morning. The color flow is locked at the story stage; every later image conforms to it.
STEP 2
캐릭터 — 정체성 마커와 감독 노트 루프Characters — identity markers and the director’s-notes loop
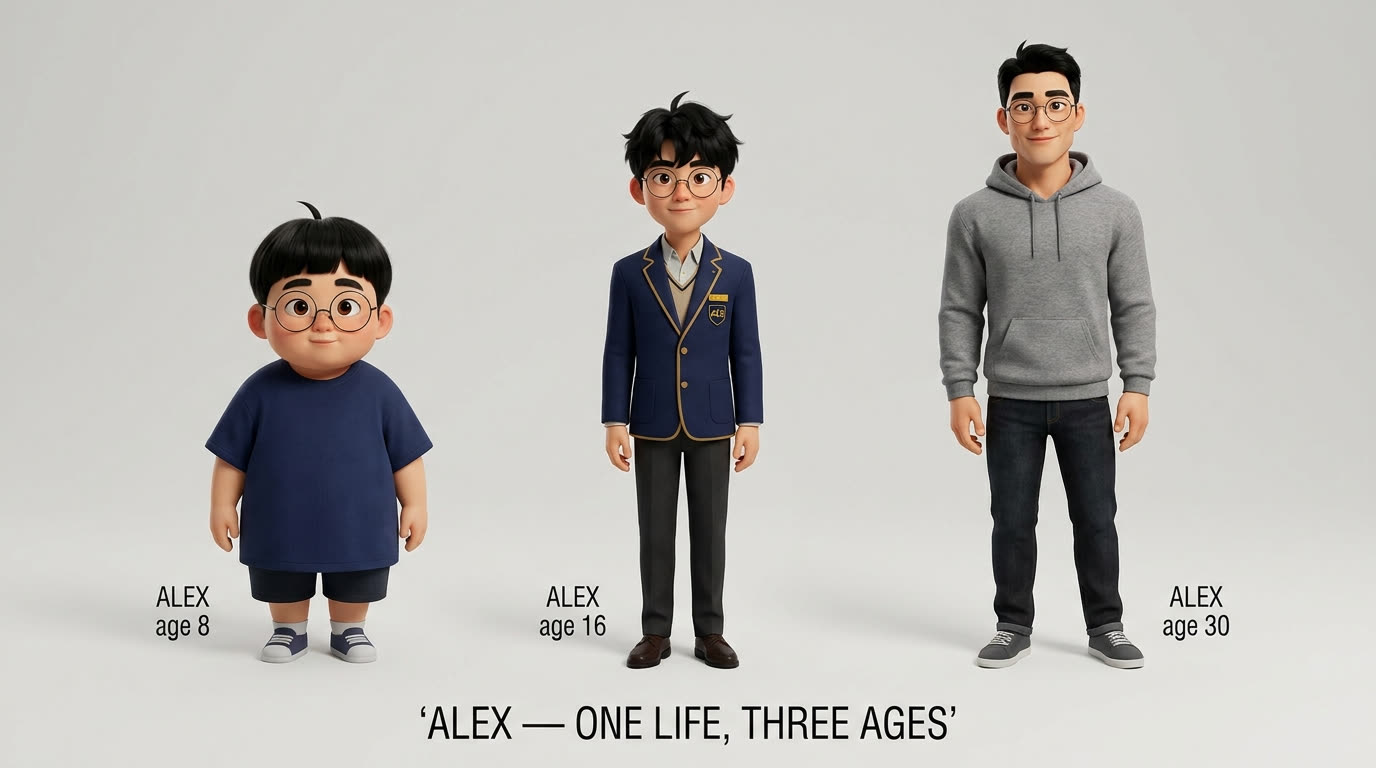
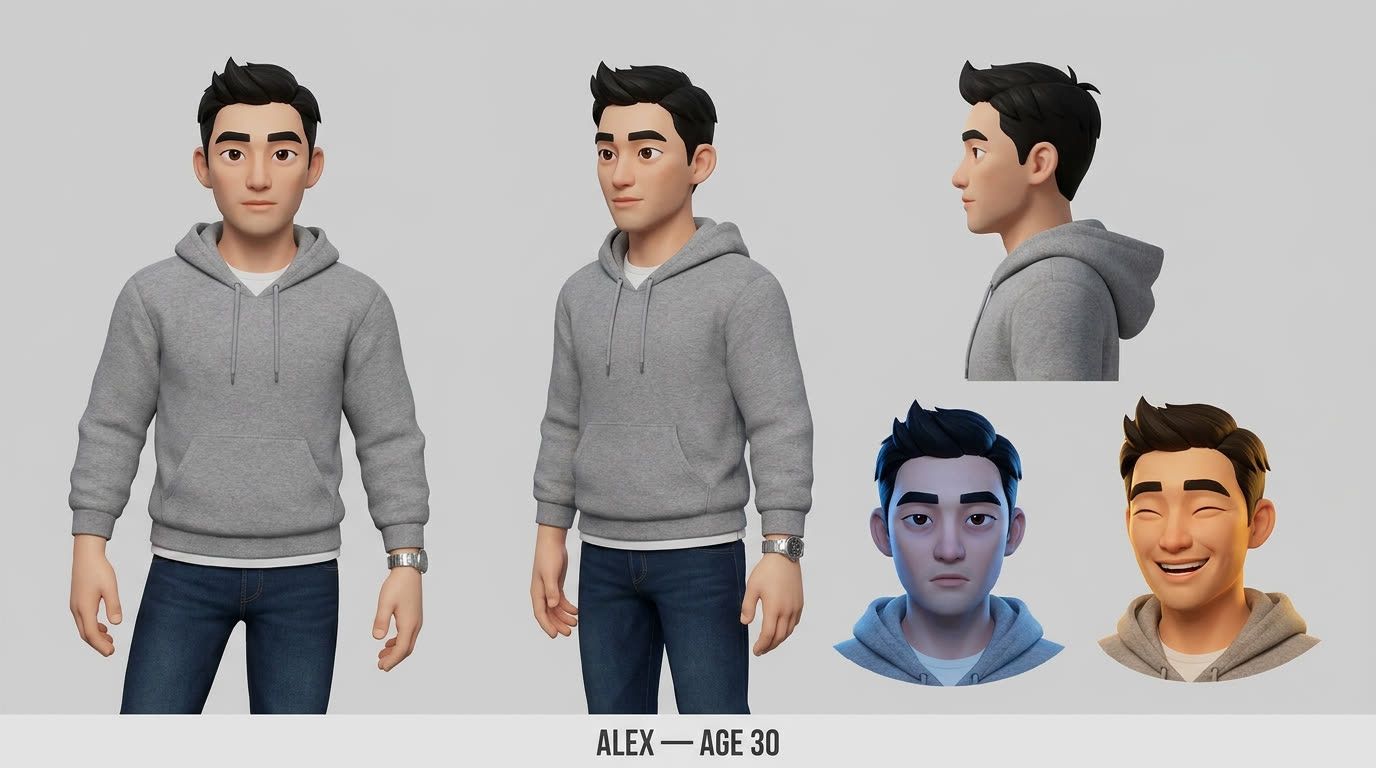
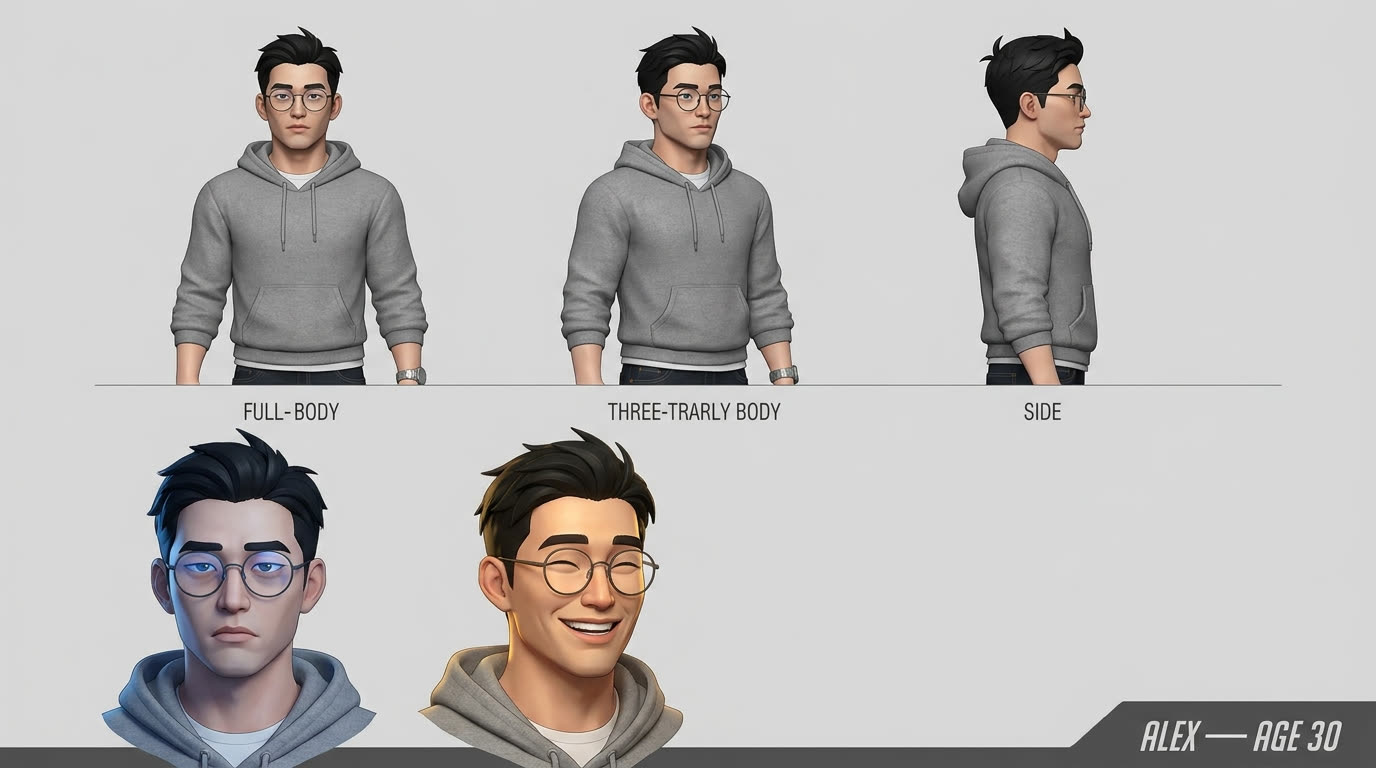
AI 영상의 최대 난제는 같은 얼굴을 유지하는 것입니다. 해법은 두 가지였습니다: ① 캐릭터마다 중립 배경의 프로덕션 시트(턴어라운드 + 표정)를 만들어 모든 생성의 레퍼런스로 첨부하고 ② 프롬프트마다 반복되는 시그니처 마커를 박아두는 것.The hardest problem in AI video is keeping the same face. Two fixes: ① build a neutral-background production sheet per character (turnaround + expressions) and attach it as reference media to every generation, and ② hard-code signature markers repeated in every prompt.
에이지 라인업 — 8살, 16살, 30살이 '같은 사람'으로 보이게 하는 시트. 나이가 바뀌어도 마커(동그란 안경, 눈썹, 가마)는 유지됩니다.The age lineup — ages 8, 16, and 30 reading as one person. The markers (round glasses, brows, cowlick) survive every age change.
v1 — 감독 노트 전v1 — before notesv3 — "안경은 해리포터처럼", "턱선 더 샤프하게" 반영 후v3 — after “Harry Potter glasses” and “sharper jawline”
핵심 루프The core loop
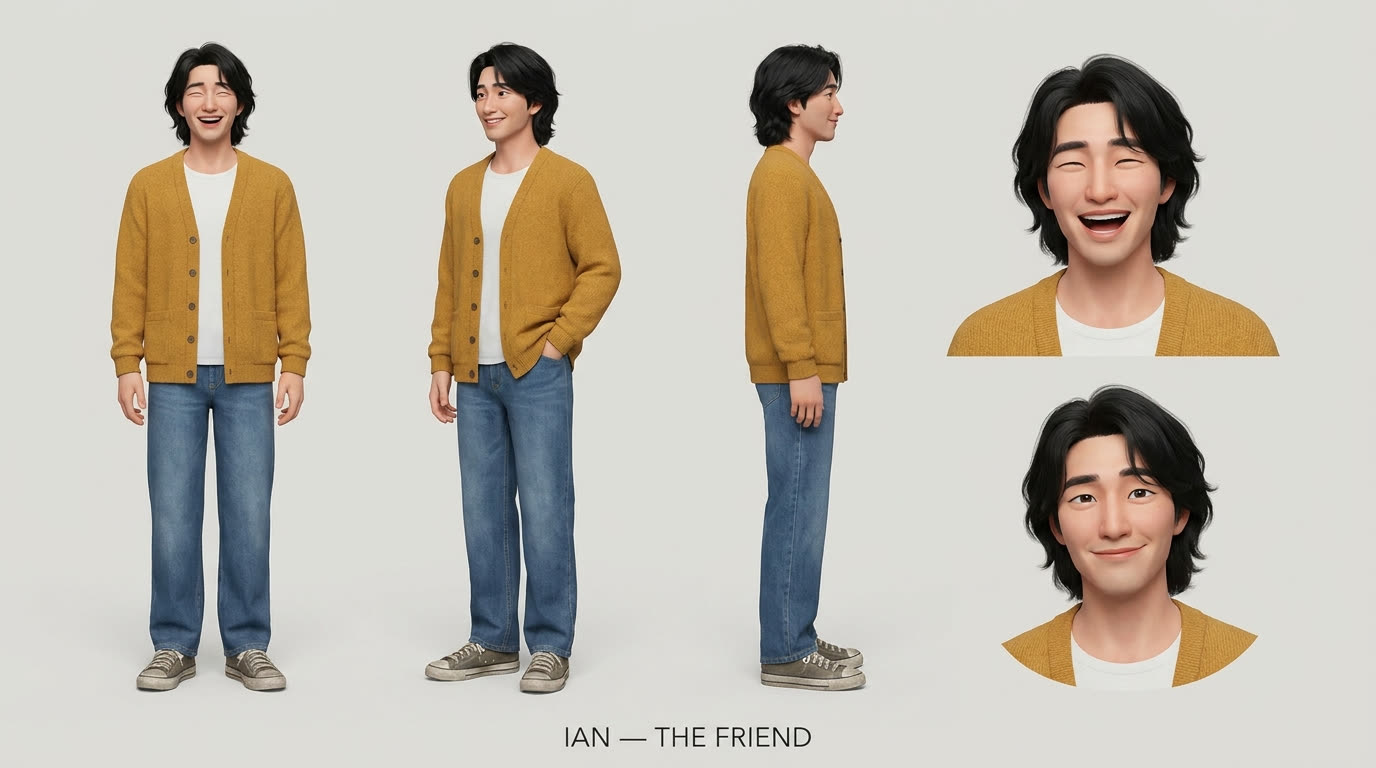
자연어 피드백 → 캐릭터 설명 수정 → 재생성 → 이전 버전은 사유와 함께 아카이브. "조던이 아니라 이안이야, 더 크고 한국인이야" 같은 한 마디가 곧 리비전입니다. 반복은 실패가 아니라 제작 과정 그 자체입니다.Plain-language feedback → edit the character description → regenerate → archive the old version with the reason. “It’s Ian, not Jordan — taller, Korean” is itself a revision. Iteration isn’t failure; it is the production process.
조연 '이안' — 영화에서 유일하게 말을 하는 인물이라, 시트가 곧 립싱크 장면의 기준이 됩니다.Supporting character Ian — the film’s only speaking role, so his sheet anchors the lip-synced scene.
STEP 3
이미지 — 무드보드와 20장의 키프레임Imagery — the mood board and 20 keyframes
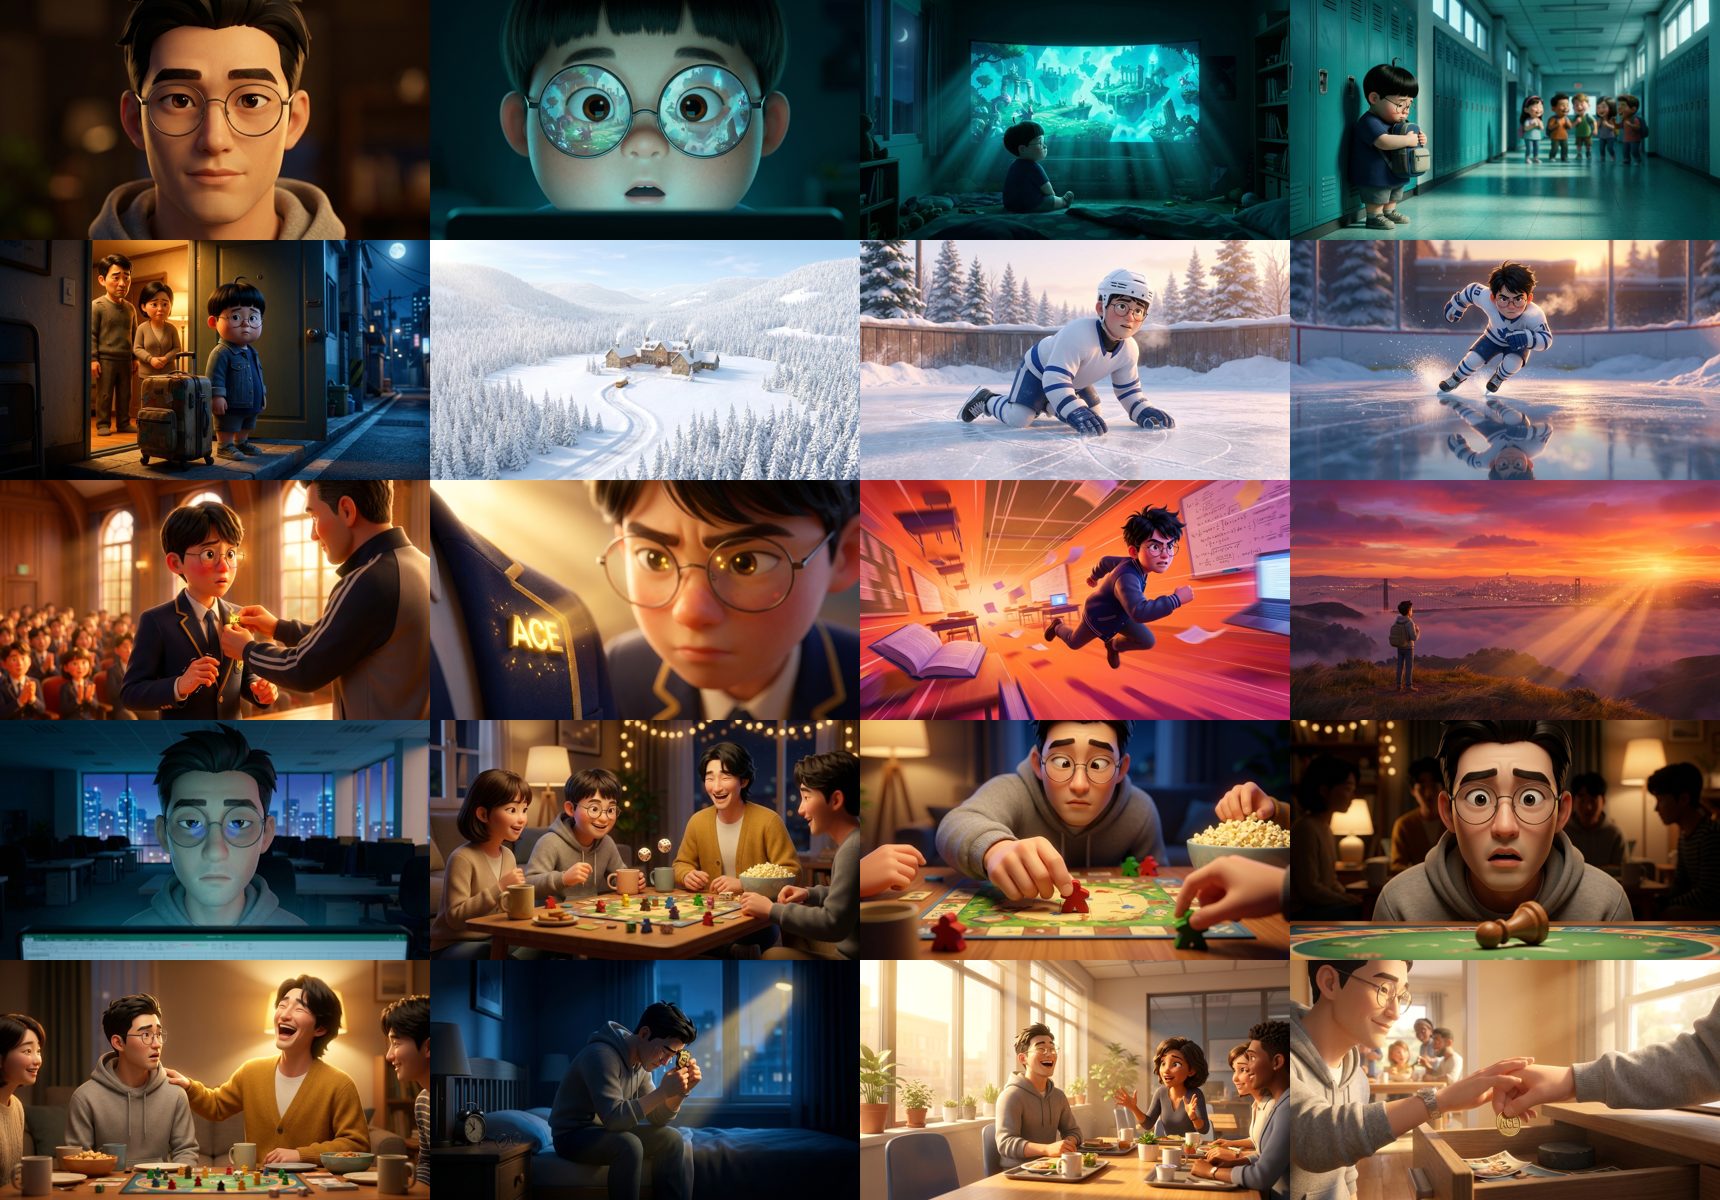
영상을 만들기 전에 영화 전체를 정지 이미지로 먼저 완성합니다. 감정 스테이션마다 무드 프레임 1장(7장), 그리고 20개 컷마다 시작 키프레임 1장. 이미지는 장당 2크레딧이라, 수십 번을 갈아엎어도 영상 1개 값이 안 됩니다.Before generating any video, finish the whole film as still images: one mood frame per emotional station (seven), then one start keyframe per shot (twenty). Images cost 2 credits each — you can redo them dozens of times for less than the price of a single video.
캐릭터 + 무드보드 콘택트 시트. 각 무드 프레임은 그 장(act)의 조명·팔레트 기준이 되어 키프레임 생성 때 레퍼런스로 첨부됩니다.Character + mood contact sheet. Each mood frame defines an act’s light and palette, then rides along as reference media for keyframe generation.20개 컷의 시작 키프레임 전부. 컬러가 이야기를 따라 흐릅니다 — 차가운 시안(도피) → 눈의 흰색(추방) → 골드(인정) → 다시 차가운 블루(공허) → 따뜻한 텅스텐(보드게임 밤) → 골든 모닝(해방).All 20 start keyframes. The color follows the story — cold cyan (escape) → snow white (exile) → gold (recognition) → cold blue again (emptiness) → warm tungsten (game night) → golden morning (release).스토리보드 시트 — 컷 번호·이름·액션·내레이션·정지 이미지가 한 장에. 이 시트가 곧 영화의 설계도입니다.The storyboard sheet — shot number, name, action, narration, and still on one page. This sheet is the film’s blueprint.
STEP 4
내레이션 — 목소리가 먼저다Narration — the voice comes first
처음엔 반대로 했다가 크게 배웠습니다. 영상 길이를 먼저 정해두고(컷당 3초) 내레이션을 구겨 넣었더니, 모든 문장이 1.3배속으로 압축돼야 했습니다. 픽사가 목소리를 먼저 녹음하고 그 위에 그림을 그리는 이유가 있었습니다.I did this backwards at first and learned the hard way. Fixing video lengths first (3s per shot) meant every line had to be time-squeezed by 1.3×. There’s a reason Pixar records the voices first and animates to them.
원칙 — Voice-firstPrinciple — voice-first
내레이션 확정 → 음성 생성 → 실제 음성 길이를 측정 → 그 길이가 각 컷의 영상 길이가 된다. 목소리를 늘리거나 줄이지 말 것. 영상이 목소리에 맞춘다.Finalize the script → generate the voice → measure each line’s real duration → that duration becomes the shot’s video length. Never stretch the voice. The picture serves the voice.
대본은 18줄. 초안을 쓴 뒤 윤문(humanize) 패스를 한 번 돌렸습니다 — 문어체 쉼표를 빼고("말을, 그대로" → "말을 그대로"), 입말로 바꾸는("친구들과" → "친구들이랑") 미세 조정 7건. 구조와 감정 곡선은 건드리지 않습니다.The script is 18 lines. After drafting, one humanize pass smoothed the written-Korean stiffness into spoken rhythm — seven particle-level adjustments, structure and emotional curve untouched.
C01 저는 한때, 죽고 싶을 만큼 불행했습니다.
C13 성공했는데… 왜 행복하지가 않을까.
C15 저도 모르게… 반칙을 했습니다.
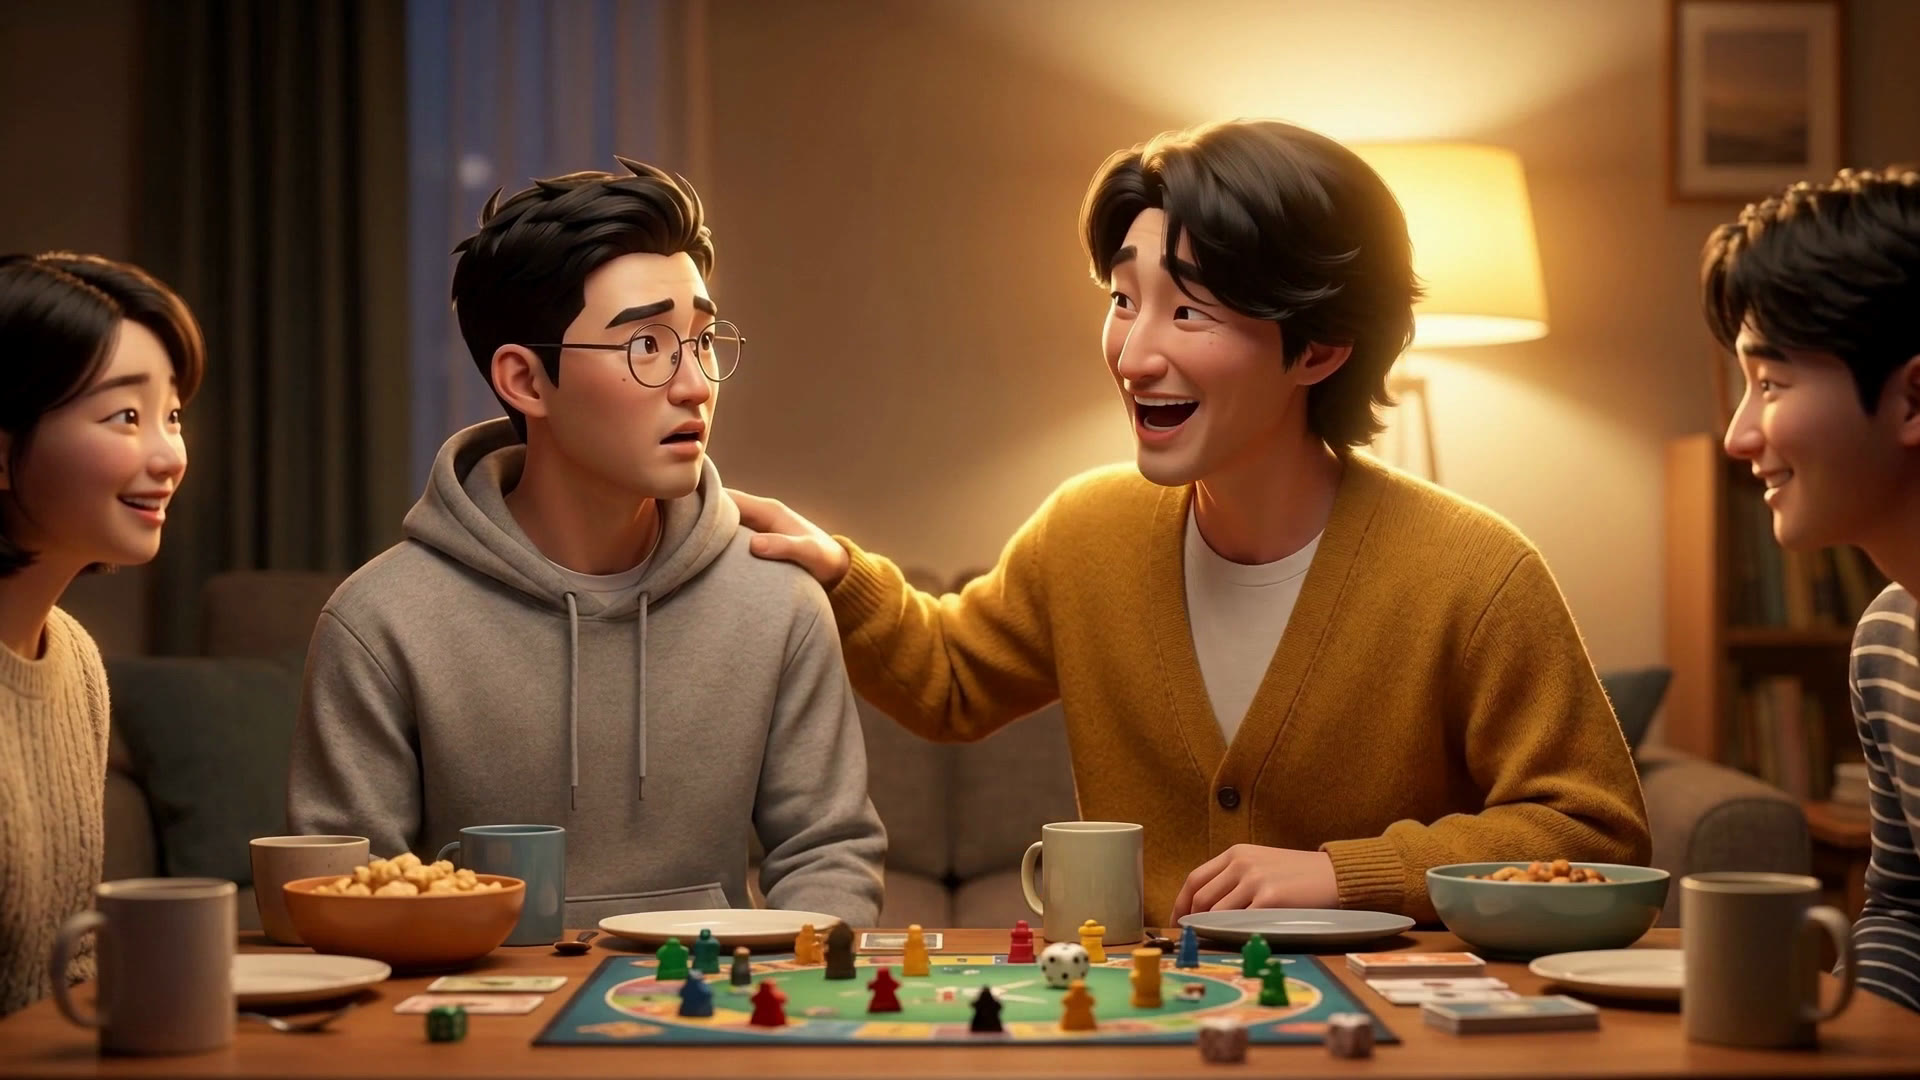
C17 [이안] "알렉스는 두 번 체크해야 돼~" ← 유일한 대사 (립싱크)the only dialogue (lip-synced)
C18 그날 밤, 펑펑 울었습니다.
C20 이제 저는 증명 대신, 사람들 곁에 있습니다.
STEP 5
보이스 클론 — 실패 두 번, 성공 한 번Voice cloning — two failures, one success
이 단계에서 가장 많이 헤맸고, 그래서 가장 공유할 게 많습니다.This is where I stumbled the most — which means it’s where the most useful lessons are.
시도Attempt
결과Result
유튜브 영상 오디오에서 클론 (BGM 섞인 압축 음원)Clone from YouTube video audio (compressed, BGM baked in)
❌ "이거 내 목소리가 전혀 아닌데?"❌ “This is not my voice at all.”
인스턴트 클론 + 감정 연기 모델(v3)로 톤 연출Instant clone + expressive model (v3) with acting tags
❌ 감정은 살았지만 정체성이 흔들림 — 연기하는 남, 내가 아님❌ Emotion appeared but identity drifted — an actor performing, not me
프로페셔널 클론(PVC) — 깨끗한 롱폼 녹음 104분으로 학습 + 안정적인 모델(multilingual v2) + 설정으로만 톤 제어Professional clone (PVC) — trained on 104 min of clean long-form recording + the stable model (multilingual v2) + tone via settings only
✅ 차분하지만 온전히 내 목소리✅ Calm, and fully me
최종 설정값 (다큐멘터리 톤다운)Final settings (toned-down documentary)
model: eleven_multilingual_v2
stability: 0.65–0.78 ← 높을수록 차분·진중higher = calmer, graver
style: 0.08–0.2 ← 낮을수록 담담lower = flatter, solemn
speed: 0.80–0.95 ← 느리게, 단 컷 길이 안에서slower, within each shot's window
학습 음원이 90%다. BGM 없는 무압축 솔로 녹음 30분 이상. 유튜브 업로드본은 안 됩니다 — 원본 녹음 파일을 쓰세요.The training audio is 90% of it. 30+ minutes of BGM-free, uncompressed solo speech. Not your YouTube uploads — use the raw recordings.
감정은 모델이 아니라 설정으로. 표현력 좋은 모델일수록 클론의 정체성을 느슨하게 잡습니다. 자기 목소리가 중요하면 안정적인 모델 + stability/style/speed 다이얼.Emotion via settings, not via model. The more expressive the model, the looser its grip on a clone’s identity. If sounding like yourself matters, use the stable model and dial stability/style/speed.
줄 사이 숨이 필요하다. 줄 간 0.9초, 감정 피크 뒤엔 1.2~1.4초. 이 '숨'이 편집의 절반입니다.Lines need breath between them. 0.9s between lines, 1.2–1.4s after emotional peaks. That air is half the edit.
스포일러: 클론은 훌륭한 제작용 목소리입니다 — 수십 번 다시 읽어도 지치지 않으니까요. 하지만 최종판에서는 결국 마이크 앞에 직접 앉았습니다. 그 이야기는 STEP 9에서.Spoiler: the clone is a great production voice — it never tires of re-reads. But for the final version I ended up sitting at the mic myself. That story is in STEP 9.
STEP 6
샘플 영상 — 무조건 저해상도 먼저Sample video — always lowest resolution first
영상 크레딧은 이미지의 20배가 넘습니다. 그래서 철칙: 모든 영상은 480p 초저가 모드로 먼저 뽑고 확인한 뒤에만 고해상도로 갑니다. 같은 5초가 프리뷰에선 7.5크레딧, 프로덕션(1080p)에선 45크레딧입니다.Video credits cost 20× images. Hence the iron rule: every shot renders first in cheap 480p fast mode; only confirmed shots graduate to high resolution. The same 5 seconds costs 7.5 credits in preview and 45 in production 1080p.
또 하나의 무기는 멀티씬 생성입니다. 연속된 장면은 컷을 나눠 따로 뽑지 않고 한 번의 생성 안에 타임스탬프로 편집점을 지시합니다 — 인물과 조명이 컷을 넘어 이어지는 비결입니다.The other weapon is multi-scene generation: consecutive shots are generated as one clip with timestamped cut instructions inside the prompt — that’s how identity and lighting stay continuous across cuts.
[0-3.6s] Wide, static: four friends around a board game, dice tumble, laughter…
[3.6-6.85s] HARD CUT to insert: his hand slides a piece two spaces; a glance left, right…
[6.85-8.65s] HARD CUT to close-up: caught — his face freezes mid-breath…
[8.65-12s] HARD CUT to two-shot: his friend laughs and says in Korean, lip-synced:
"알렉스는 두 번 체크해야 돼~"
480p 프리뷰 컷 — 이 단계에서 스타일 드리프트, 얼굴 일관성, 타이밍을 전부 검증합니다. 여기서 통과해야 프로덕션 크레딧을 씁니다.The 480p preview cut — style drift, face consistency, and timing all get verified here, before a single production credit is spent.
STEP 7
파이널 — 1080p, 현장음, 립싱크Final — 1080p, ambience, lip-sync
프리뷰가 승인되면 같은 프롬프트·같은 레퍼런스로 1080p 표준 모드 재생성. 이번엔 네이티브 오디오를 켭니다 — 모니터의 웅웅거림, 새벽 빙판의 스케이트 날, 강당의 박수, 주사위 소리가 장면마다 함께 생성됩니다. 그리고 이안의 대사는 TTS가 아니라 영상 자체가 립싱크로 말합니다.Once the preview passes, the same prompts and references re-render in 1080p std mode — this time with native audio on: monitor hum, skate blades at dawn, auditorium applause, rolling dice, all generated per scene. And Ian’s line isn’t TTS — the video itself speaks it, lip-synced.
파이널 1080p 스틸 — 영화의 유일한 대사 순간. "알렉스는 두 번 체크해야 돼~"Final 1080p still — the film’s only spoken moment. “Alex has to check twice~”
마지막 믹스: 컷별 현장음을 내레이션 아래로 덕킹(-8dB), 이안의 대사 구간만 풀 볼륨, 전체를 -14 LUFS로 정리. 자막은 두 벌 — 영상에 굽는 버전과, 유튜브 업로드용 .srt.The final mix: per-shot ambience ducked −8dB under the narration, full volume only for Ian’s line, mastered to −14 LUFS. Subtitles ship two ways — burned-in, plus a .srt for YouTube.
STEP 8
배경음악 — Suno로 언더스코어 작곡Music — composing the underscore with Suno
영상 모델이 만들어 준 현장음(주사위 구르는 소리, 새벽 빙판의 스케이트 날)은 훌륭하지만 영화 전체를 하나로 묶는 언더스코어는 따로 필요했습니다. 도구는 Suno(v5.5), Custom + Advanced 모드. 스타일 프롬프트의 공식은 이렇습니다:The video model’s in-scene sound (rolling dice, skate blades at dawn) is great, but the film still needed an underscore to bind it together. Tool: Suno v5.5, Custom + Advanced mode. The style-prompt formula:
두 방향을 실제로 시도했습니다 — 미니멀과 시네마틱. 한 번 생성에 테이크가 2개씩 나오니, 프롬프트 2개면 후보 4곡입니다.I tried two directions — minimalist and cinematic. Each submit yields two takes, so two prompts gave four candidates.
A) Minimalist emotional film underscore, sparse felt piano, soft string
swells, 68 BPM, warm intimate production, melancholic turning hopeful
B) Cinematic orchestral film score, sweeping strings, French horn swells,
intimate piano theme, subtle timpani, 70 BPM, emotional build from
tender to soaring, warm hopeful finale, lush studio production
Instrumental 토글은 필수, 그리고 Exclude styles에 보컬 계열을 전부 적으세요 — male vocals, female vocals, choir, humming. 안 그러면 언더스코어에 허밍이 스며듭니다.The Instrumental toggle is mandatory, and list every vocal type in Exclude styles — male vocals, female vocals, choir, humming. Otherwise humming leaks into your underscore.
Duration 필드는 종종 무시됩니다 — 75초를 요청해도 2~3분짜리가 나오기도. 괜찮습니다: 필요한 구간만 쓰고 페이드아웃하거나, 곡의 고조부가 영화의 감정 전환점에 오도록 구간을 밀면 됩니다.The duration field is often ignored — ask for 75s, get 2–3 minutes. Fine: use the section you need with a fade-out, or slide the window so the swell lands on the film’s emotional turn.
오디션은 반드시 영상 아래에 깔아서. 후보 4곡을 솔로로 들으면 판단이 틀립니다. 각 곡을 영상 밑에 −10dB로 깔고 필름 끝 2.5초 전에 페이드시킨 프리뷰 믹스 4개를 만들어 비교했습니다.Audition in context, never solo. Judging candidates on their own misleads. Each take was laid under the film at −10dB with a fade 2.5s before the end — four preview mixes, compared side by side.
믹스 순서 — 이것만은Mix order — the one rule
현장음(내레이션 아래로 덕킹) → 내레이션 → 음악(맨 아래) → 그리고 라우드니스 정리(−14 LUFS)는 항상 맨 마지막. 중간에 정리하면 다음 레이어를 얹을 헤드룸이 사라집니다.Ambience (ducked under narration) → narration → music (under everything) → and loudness normalization (−14 LUFS) always comes last. Normalize early and you lose the headroom for the next layer.
STEP 9
디렉터스 컷 — 결국, 진짜 내 목소리로Director’s cut — in the end, my real voice
클론 내레이션 버전으로 영화는 이미 '완성'이었습니다. 그런데 계속 마음에 걸리는 게 딱 하나 — 마지막 5%의 진짜 감정. 그래서 최종판은 직접 녹음하기로 했습니다. 이때 필요한 준비물이 재미있습니다:The clone-narrated version was already “done.” But one thing kept nagging — the last 5%: real emotion. So the final version got recorded by me. The kit for this is the interesting part:
노보이스(no-voice) 마스터 — 같은 타임라인, 같은 현장음(덕킹 포함), 내레이션만 뺀 영상. 중요한 디테일: 이 마스터에는 라우드니스 정리를 하지 않습니다. 목소리를 얹을 헤드룸을 남겨두는 겁니다.A no-voice master — same timeline, same ambience (ducking included), narration removed. Key detail: this master is not loudness-normalized, leaving headroom for the voice to come.
녹음 큐시트 + 가이드 자막 — 컷별 시작 시각과 원래 테이크 길이(페이스 참고용)를 적은 표, 그리고 영상 파일과 같은 이름의 .srt. 파일명이 같으면 플레이어가 자막을 자동으로 얹어 주니, 영상을 틀어놓고 프롬프터처럼 따라 읽으면 됩니다.A recording cue sheet + guide subtitles — per-shot start times and original take lengths (for pacing), plus an .srt named identically to the video so any player auto-loads it. Play the film, read along like a teleprompter.
컷 단위 녹음 — c01, c02… 컷별로 한 파일씩. 립싱크 대사 컷(이안의 "두 번 체크해야 돼~")은 건너뜁니다 — 그 목소리는 영상이 이미 말하고 있으니까요.Record per shot — one file per cut, c01, c02… Skip the lip-synced dialogue shot (Ian’s line) — the video already speaks that one.
배치 → 믹스 → 마지막에 정리 — 녹음을 타임라인 오프셋에 배치하고 음악까지 얹은 뒤, 그제서야 −14 LUFS로 마스터. 위 히어로 영상의 실측값은 −13.6 LUFS입니다.Place → mix → normalize last — takes at their timeline offsets, music underneath, and only then master to −14 LUFS. The hero video above measures −13.6 LUFS.
비교용 — AI 클론 내레이션 버전(480p, 음악 없음). 맨 위의 최종판과 이어서 보면, 진짜 목소리와 음악이 더한 마지막 5%가 들립니다.For comparison — the AI-clone narration version (480p, no music). Watch it against the final at the top and you can hear the last 5% that the real voice and the music add.
클론이냐, 직접 녹음이냐Clone or your own voice?
클론은 제작의 목소리입니다 — 대본이 바뀔 때마다 지치지 않고 다시 읽어 주니까, 타이밍과 편집을 확정하는 동안엔 클론이 맞습니다. 직접 녹음은 완성의 목소리입니다. 순서가 핵심입니다: 클론으로 영화를 완성한 뒤, 그 구조 위에 진짜 목소리를 얹으세요. 파이프라인은 동일합니다 — 목소리가 먼저, 영상이 맞춘다.The clone is the voice of production — it re-reads every script revision without tiring, so it’s right while timing and edit are being locked. Your own voice is the voice of finishing. The order matters: finish the film with the clone, then lay your real voice onto that structure. Same pipeline either way — voice first, picture follows.
내레이션 18줄 × 여러 버전 (ElevenLabs 구독) + TTS 실험 ~10cr18 lines × several versions (ElevenLabs subscription) + TTS experiments ~10cr
~10 cr
음악Music
Suno 언더스코어 — 프롬프트 2개 × 테이크 2개 = 후보 4곡Suno underscore — 2 prompts × 2 takes = 4 candidates
Suno 크레딧Suno credits
합계 (72초 영화 1편)Total (one 72-second film)
~1,020 cr
+ ElevenLabs Creator 플랜(월 $22, PVC 학습 포함) + Suno 생성 크레딧 소량(언더스코어 2회 생성). 재롤을 아꼈다면 절반으로도 가능합니다 — 비결은 위의 preview-first 원칙입니다. 직접 녹음 파이널은 마이크 값 외에 추가 비용이 없습니다.+ ElevenLabs Creator plan ($22/mo, includes PVC training) + a small amount of Suno credits (two underscore submits). With fewer re-rolls this halves — the preview-first rule above is how. The self-recorded final costs nothing beyond a microphone.
기억할 일곱 가지Seven things to remember
목소리가 먼저. 내레이션 길이가 영상 길이를 정한다. 반대로 하면 모든 문장이 압축된다.Voice first. Narration length defines video length. Backwards, every sentence gets crushed.
저해상도 먼저. 480p에서 전부 검증하고 승인된 것만 1080p로. 크레딧의 대부분은 여기서 절약된다.Low-res first. Verify everything at 480p; only approved shots graduate to 1080p. This is where most credits are saved.
정체성 마커를 박아라. "동그란 안경 + 짙은 일자 눈썹" 같은 마커가 모든 프롬프트에 반복돼야 20컷 내내 같은 사람이다.Hard-code identity markers. “Round wire-rim glasses + thick straight brows” repeated in every prompt is what keeps one person across 20 shots.
감독 노트로 말하라. "턱선 더 샤프하게" 한 마디면 된다. 반복은 실패가 아니라 제작이다. 이전 버전은 사유와 함께 아카이브.Direct in plain language. “Sharper jawline” is enough. Iteration is production, not failure. Archive old versions with reasons.
전부 기록하라. 모든 생성의 프롬프트·설정·비용을 남기면, 어떤 컷이든 한 문장으로 다시 만들 수 있다.Record everything. Keep every generation’s prompt, settings, and cost — and any shot can be remade with one sentence.
음악은 맥락에서 골라라. 후보 트랙을 솔로로 듣지 말고 영상 아래에 깔아서 비교한다. 그리고 라우드니스 정리는 언제나 믹스의 맨 마지막.Pick music in context. Never judge candidate tracks solo — lay each under the film and compare. And loudness normalization always comes last in the mix.
클론으로 만들고 진짜 목소리로 완성하라. 클론이 타이밍과 구조를 잡아주는 동안 마음껏 고치고 다 굳은 뒤 마이크 앞에 앉는다. 마지막 5%의 감정은 진짜만 낼 수 있다.Build with the clone, finish with your voice. Revise freely while the clone holds timing and structure; sit at the mic once everything is locked. The last 5% of emotion only the real thing can give.
직접 만들어 보세요Make your own
당신의 인생에도 '두 번 체크' 같은 순간이 있습니다. 영상 하나, 일기 한 편, 오래된 사진 한 장 — 원본은 뭐든 됩니다. 자세한 제작기는 유튜브 커리어해커 알렉스 채널에서 영상으로 공개합니다.Your life has a “check twice” moment too. One video, one diary entry, one old photo — any source works. The full video walkthrough is coming to my YouTube channel, Career Hacker Alex.